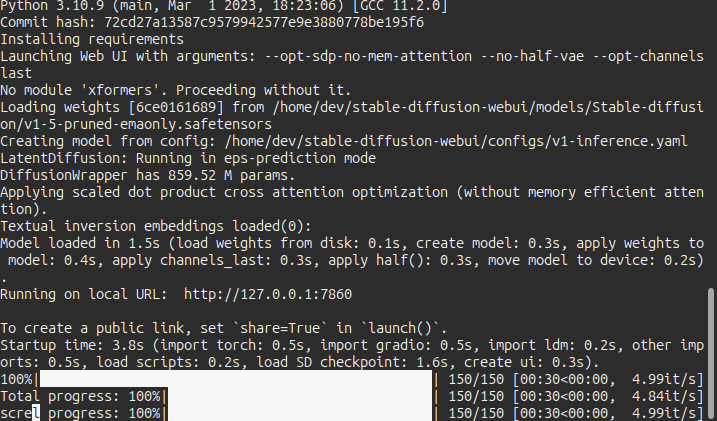
I use a clean installation of Ubuntu 23.04 Lunar Lobster and Nvidia driver 525. If you already have the driver installed, here are the steps to improve Automatic111 Stable Diffusion performance to 40-44 it/s
- Install required Anaconda
Ubuntu 23.04 default Python version is 3.11 version. In this case, I will using Anaconda to provide Python 3.10. Download Anaconda and install
chmod a+x /Anaconda3-2023.03-1-Linux-x86_64.sh
./Anaconda3-2023.03-1-Linux-x86_64.sh
2. Install the required software for stable diffusion installation
sudo apt install build-essential git vim3. Clone and setup stable-diffusion
git clone https://github.com/AUTOMATIC1111/stable-diffusion-webui.git ~/stable-diffusion-webui

cd stable-diffusion-webui
Edit webui-user.sh (I use vim webui-user.sh) and un-comment the COMMANDLINE_ARGS and export TORCH_COMMAND below
#!/bin/bash
#########################################################
# Uncomment and change the variables below to your need:#
#########################################################

...

# Commandline arguments for webui.py, for example: export COMMANDLINE_ARGS="--xformers"

# install command for torch
export TORCH_COMMAND="pip install -torch torchvision torchaudio --force --extra-index-url https://download.pytorch.org/whl/nightly/cu118"
If you want to re-install existing:
pip install -torch torchvision torchaudio --force --extra-index-url https://download.pytorch.org/whl/nightly/cu1184. Installation
./webui.shIf you encountered by error on torchvision version, you can enter the virtualenv and continue the installation
source ~/stable-difussion-webui/venv/bin/activate

pip install clean-fid numba numpy torch==2.0.0+cu118 torchvision torchaudio xformers --force-reinstall --extra-index-url https://download.pytorch.org/whl/cu118

./webui.sh
5. Fixing the libnvrtc.so
You may encountered with this issue when start to generate the images
Could not load library libcudnn_cnn_infer.so.8. Error: libnvrtc.so: cannot open shared object file: No such file or directory
Aborted (core dumped)
The solution is
cd ~/stable-diffusion-webui/venv/lib/python3.10/site-packages/torch/lib
ln -s libnvrtc-672ee683.so.11.2 libnvrtc.so
6. Benchmark!
There are several way, first easy one from Mad 40it/s Discord
Here are instructions to perform it on AUTOMATIC1111's SD WebUI:

- Hit generate (the first generation is slower, so get it out of the way)
- Ensure you're using model SD v1.5 ema only (https://huggingface.co/runwayml/stable-diffusion-v1-5/resolve/main/v1-5-pruned-emaonly.safetensors).
- Use sampler Euler A and width/height 512x512.
- 150 steps.
- Batch size 8 (not batch count!).
- Prompt "cat in the hat".
- Hit generate!
- Look in the console and calculate 1200 ÷ <the number of seconds it took> to get your it/s.
My time is 30 seconds, so my performance is 40it/s

7. How to benchmark?
Go to Tab: Stable Diffusion Web -> Extensions -> Available -> Click Load from. Once finished, search “system” and install the extensions.
Then move to Installed and click button “Apply and Restart UI”. Now you see tab “System Info”. Have fun for benchmarking!
8. You already installed CUDA and Cuddn but not detected?
Update your .bash_rc with this and reload it!
export PATH=/usr/local/cuda/bin${PATH:+:${PATH}}

export LD_LIBRARY_PATH="/usr/local/cuda/lib64:/usr/local/cuda-10.1/lib64:/usr/local/cuda-11/lib64:/usr/local/cuda-11.1/lib64:/usr/local/cuda-11.2/lib64${LD_LIBRARY_PATH:+:${LD_LIBRARY_PATH}}"
9. You have no idea to install CUDA and Cudnn in Ubuntu?
wget https://developer.download.nvidia.com/compute/cuda/12.1.1/local_installers/cuda_12.1.1_530.30.02_linux.run

~/.bashrc
export PATH=/usr/local/cuda-12.1/bin${PATH:+:${PATH}}
export LD_LIBRARY_PATH=/usr/local/cuda-12.1/lib64${LD_LIBRARY_PATH:+:${LD_LIBRARY_PATH}}
export CUDA_HOME=/usr/local/cuda
Go Download CUDDN at https://developer.nvidia.com/rdp/cudnn-download
tar -xzvf cudnn-6.5-linux-R1.tgz
mv cudnn-6.5-linux-R1 cudnn

sudo cp -av cudnn/include/cudnn*.h /usr/local/cuda/include
sudo cp -av cudnn/lib/libcudnn* /usr/local/cuda/lib64
sudo chmod a+r /usr/local/cuda/include/cudnn*.h /usr/local/cuda/lib64/libcudnn
PS: Xformers only works with CUDA 11 version at the moment. So you would like to use that version until its supported