Categories
Windows

Fix GPU load 100% Desktop Window Manager Windows 11

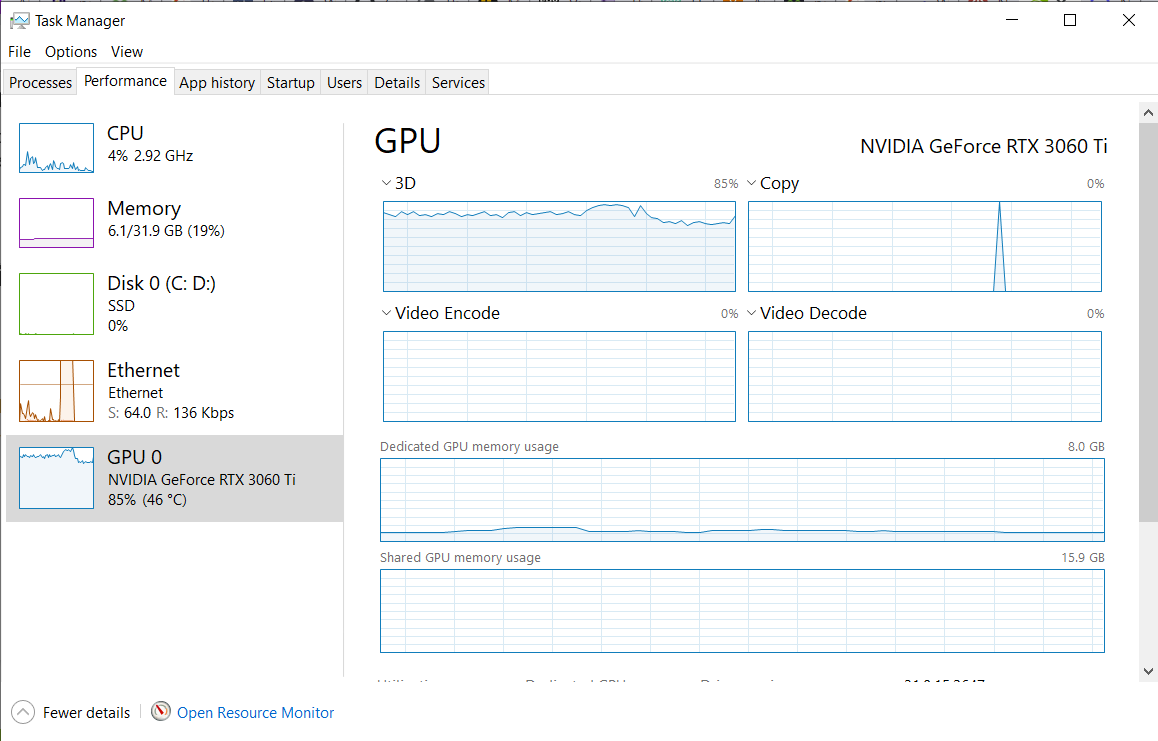
When your PC feels laggy with Nvidia GPU drivers that keep hitting 100% under idle situations, there are several chances to cause that problem.

Either its virus, trojan on mining crypto, the NVIDIA drivers mismatch, misconfiguration on NVidia settings, Windows scaling issues and many more

After tweaking several stuff, I gave up and decided to solve this by revert back to Windows 10 with NVCleanStall. There result is amazing, now my GPU load RTX 3060 Ti is back to normal

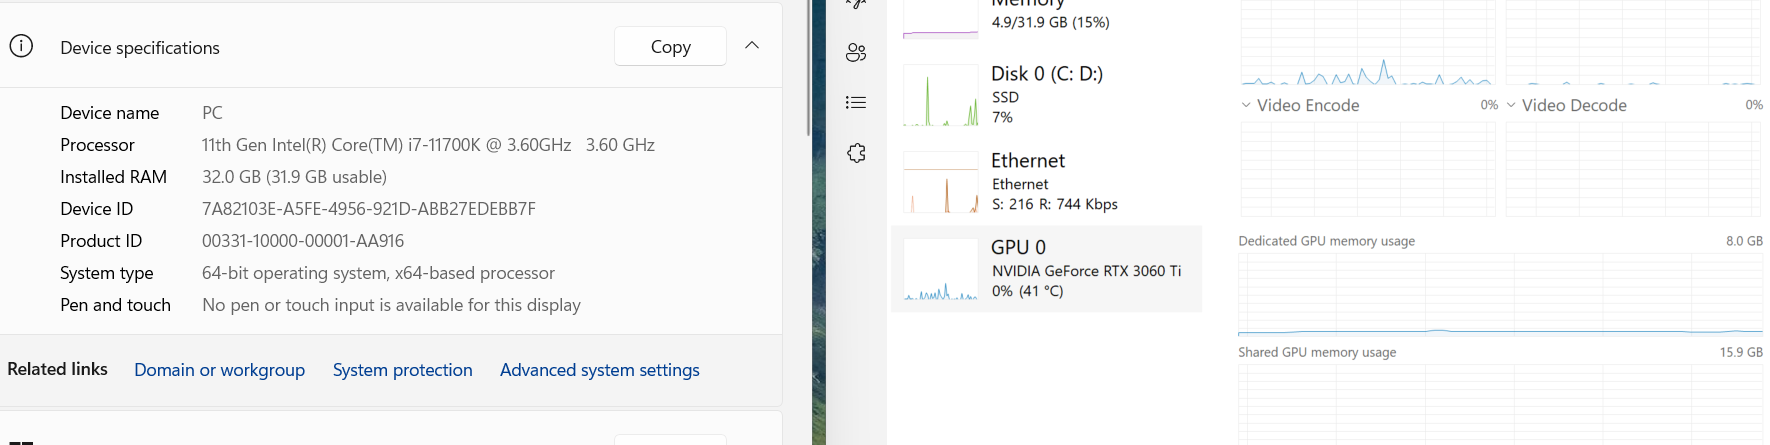
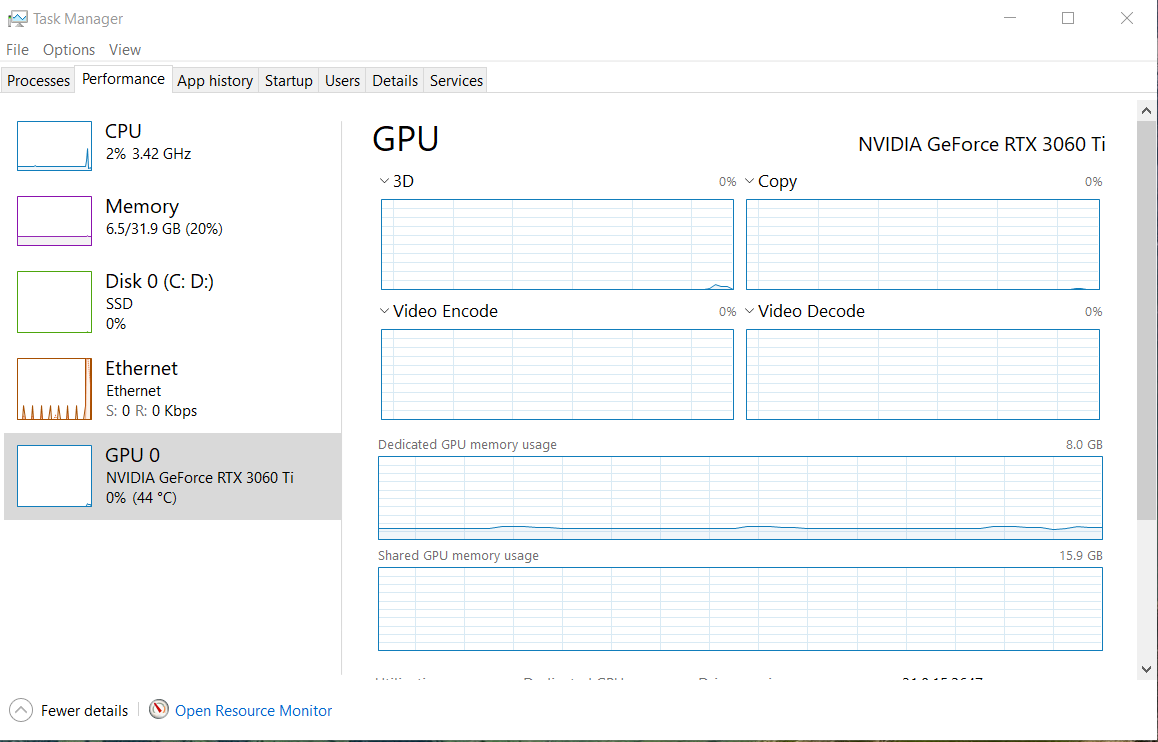
Ideally, when your Windows is idle, your GPU load utilization should be like this

Fyi, this is running under 240hz of monitor refresh rate and using Windows 11 22H2

To solve the problem:

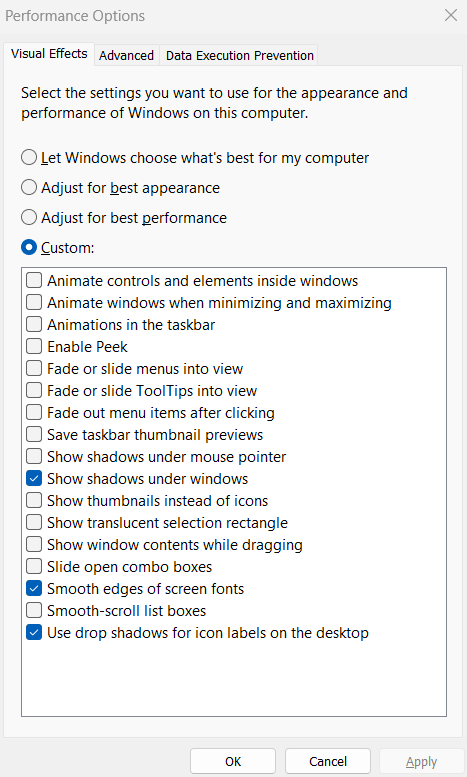
  1. Reduce performance by go to Windows start menu “Adjust the appearance and performance of windows”.
  2. Try to remove unnecessary animation and others stuff.

3. Install the latest Nvidia drivers and do not change the
4. Go to Task Manager, find Desktop Window Manager, right click and choose “Go to Details”. Find dwm.exe and right click. Set priority to Normal.

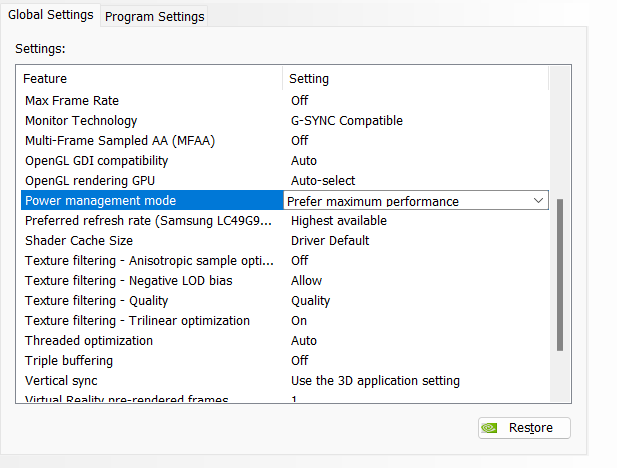
If the GPU load still high, Please check your Nvidia settings and change Power Management from “Prefer Maximum Performance” into “Normal” then reboot.

If this High GPU load still exists, the last resort is to “uninstall your GPU Nvidia Driver” and use the default driver from Windows (early version)

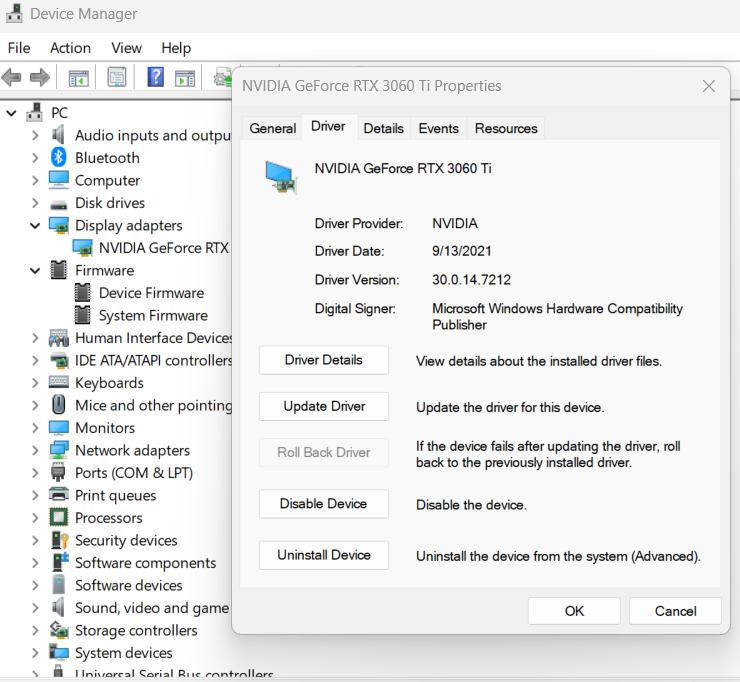
In my case, the 2021 drivers works like a charm for me!

Categories
Machine Learning

Install Tensorflow run with GPU RTX in Windows 11

Note:

Please go to the latest update article here https://www.yodiw.com/fix-install-tensorflow-2-with-gpu-simple-version-2023/

Author

This tutorial will help you to run Tensorflow in Windows 11 to use GPU for modelling, with the latest Visual Studio, CUDA and latest drivers. In this case, I’m using RTX 3060Ti Lite Hashes and Python 3.7 – 3.10 for Windows. (I use Python 3.10.9)

TLDR;

We need to install

  • Clean Windows Installation and GPU drivers card
  • the Microsoft Visual C++ (MSVC) compiler 2022
  • the CUDA Toolkit 11.8
  • the cuDNN libraries
  • Install tensorflow

Pre-requisites

1. Windows fresh installation to remove the complexity of issues or bugs is recommended here. I did re-install my Windows 11 in this step

2. Instead of using Nvidia Geforce Experience, I uninstall the GPU drivers (back to Microsoft Basic) and use NVCleanstall to download my RTX 3060 drivers without others bloatware https://www.techpowerup.com/download/techpowerup-nvcleanstall/

3. I use Python 3.9 from Anaconda https://www.anaconda.com/products/distribution

Categories
Uncategorized

Install Windows 11 22 H2 Without Internet

The quick fix, press Shift + F10 in wireless page and type

OOBE\BYPASSNRO

Categories
Windows

Fix is not digitally signed. You cannot run this script

If you got this by running the script in Terminal or Powershell, you can fix this Windows permission issue by running

Set-ExecutionPolicy -ExecutionPolicy RemoteSigned -Scope CurrentUser
Categories
Uncategorized

Fix Chia Harvester did not respond. You might need to update harvester to the latest version

When your Chia not working, the plots not detected and you facing this issue as below:

2021-11-14T01:14:03.189 farmer chia.farmer.farmer         : ERROR    Harvester did not respond. You might need to update harvester to the latest version
2021-11-14T01:15:34.203 farmer chia.farmer.farmer         : ERROR    Harvester did not respond. You might need to update harvester to the latest version
2021-11-14T01:16:44.015 farmer chia.farmer.farmer         : WARNING  Respond plots came too late
2021-11-14T01:16:45.076 farmer chia.farmer.farmer         : WARNING  Respond plots came too late
2021-11-14T01:25:50.229 farmer chia.farmer.farmer         : ERROR    Harvester did not respond. You might need to update harvester to the latest version
2021-11-14T01:25:53.323 harvester chia.harvester.harvester: WARNING  Looking up qualities on C:\Chia\A2-1\plot-k32-2021-06-01-12-28-439ad908425b679f5b2461355304db7dfa9e2d5d43f15144f17f581de068bb9a.plot took: 166.60197138786316. This should be below 5 seconds to minimize risk of losing rewards.
2021-11-14T01:25:54.230 farmer chia.farmer.farmer         : WARNING  Respond plots came too late
2021-11-14T01:28:55.762 farmer chia.farmer.farmer         : ERROR    Harvester did not respond. You might need to update harvester to the latest version
2021-11-14T01:30:26.760 farmer chia.farmer.farmer         : ERROR    Harvester did not respond. You might need to update harvester to the latest version
2021-11-14T01:31:00.841 harvester chia.harvester.harvester: WARNING  Looking up qualities on C:\Chia\A1-4\plot-k32-2021-07-07-10-53-1551a1b70e7d90261a19047a186a4839bac323d6e2f581e74456d9b4e2ee7e91.plot took: 236.3222620487213. This should be below 5 seconds to minimize risk of losing rewards.
2021-11-14T01:31:02.674 farmer chia.farmer.farmer         : WARNING  Respond plots came too late
2021-11-14T01:31:04.106 farmer chia.farmer.farmer         : WARNING  Respond plots came too late
Categories
Devops

Adjust fan speed Dell R730 Poweredge

By default, it will going to 100% which consume more watt and noises. To adjust your Dell R730RD Poweredge fan speed, you can do this step.

Dell R730 Fan Speed

1. Get the IPMI ip address, username and password

2. Install the IPMI client https://www.dell.com/support/home/en-id/drivers/driversdetails?driverid=m63f3&driverid=m63f3

3. Open your powershell and execute these command

ipmitool.exe -I lanplus -U username -P password -H 192.168.18.7 raw 0x30 0x30 0x01 0x00

This command will enable the option to modify the fan speed. Next you can add this example to go 80% of speed

ipmitool.exe -I lanplus -U username -P password -H 192.168.18.7 raw 0x30 0x30 0x02 0xff 0x50

Or you can change the last two alphanumeric with the conversion from

https://www.rapidtables.com/convert/number/decimal-to-hex.html?x=75

Categories
Windows

How to Import password google chrome feature in Windows 10

Quick way to import password in Google Chrome, where its disabled by default or not found in settings. If you are using windows, you can go right-click on the Chrome desktop icon and choose Properties

Then, change the shortcut path and add “–enable-features=PasswordImport” in Target icon shortcut

C:\Users\dev\Downloads\chrome-win\chrome-win\chrome.exe --enable-features=PasswordImport --max-old-space-size=16384
Categories
Networking

Setup Router following another main Router IP Address

In this case, I’m using Asus RT-AC59U V2 connected to main router from Internet provider. Before i’m explaining how to do it, the reason why I need to have the same IP address class across network, is to make sharing or ping between them easily.

First, I just realized any computer in the network able to ping computer A that connected to main router via LAN. Meanwhile, computer B that connected from another router can’t received ping from computer A.

After checking on “ipconfig”, I found both machine A and B have different IP address class eg: 192.168.50.xxx and 192.168.4.xxx. This is why cant ping between computer.

Fyi, I’m using both Ubuntu Server and Windows 10 in this network. Where for Windows 10, the firewall already turn off and sharing mode in LAN settings already on.

The Solution

I decided to reset my Asus router. After read through the Asus product documentation https://dlcdnets.asus.com/pub/ASUS/wireless/RT-AC59U/E15565_RT-AC59U_UM_v2_WEB.pdf I found the culprit is rely on operation mode.

So, my router by default have operation mode as “Wireless router mode”. in WAN settings, it’s received IP from main router. But, when other PC connect to this Asus router, it will have 192.168.50.xx.

Then, I change my ASUS operation mode into Access Point mode and problem solved! All the machine that connected to my router will following the same IP address as main router!

Categories
Networking

Ubuntu Listening Who Ping me

Often we want to know who others IP address that currently send ping to our server. To detect this, can use this script

sudo tcpdump -i <YOUR-ETH-DEVICE) icmp and icmp[icmptype]=icmp-echo

#sudo tcpdump -i eth2 icmp and icmp[icmptype]=icmp-echo
Categories
Networking

Mount NTFS shared folder Windows in Ubuntu write access

If you want to mount your shared partition or folder in Windows 10 to be accessible from Ubuntu server, you can use CIFS. Here is the step

sudo mount -t cifs -o user=YOUR-UBUNTU-USERNAME,username=YOUR-WINDOWS-USERNAME,password=YOUR-WINDOWS-PASSWORD,dir_mode=0777,file_mode=0777 //YOUR-WINDOWS-IP-ADDRESS/PATH-FOLDER /media/MOUNT-PATH